Where to begin:)? Let's start with before pictures:


And here's a picture of a Menard's sale flyer several months back:


One grey deck in need of stain.
And here's a picture of a Menard's sale flyer several months back:

The upper right corner of the ad depicts the $1.97/gallon stain that we used.
We picked up five gallons (Maximum allowed for the rebate) in three different colors. We were pretty sure about the color, but we tested all three to be sure. We decided on Cedar which was the lightest option and we ended up with three gallons of it.


On our 'test' piece of deck it appeared a nice, medium brown. I don't generally like the super orange cedar color (ie: The original and current color of our play set.), but I don't mind the less intense version of cedar.
I started staining at 9:30am on Sunday morning on our front porch railings. I noticed immediately that the stain was going on much, much darker than anticipated and was looking more red-brown than the cedar color we had anticipated seeing. My first thought was cheap stain, cheap result...you get what you pay for. I finished staining the front railing using the stain on hand because I figured that stopping mid way would be the worst thing I could do. After about 90 minutes of staining, Bill and I carefully analyzed the result. What we decided was that the stain didn't look bad, it just wasn't what we were expecting. It made the railings blend with the house color instead of popping, and that's not a bad thing. The result was certainly not horrible and was much better than the super grey wood color that we started with.
(As an aside, I'm very leery to post exterior photos of the front of our house for the general public to view, so I probably never will. It's the mother bear in me or something. In the same regard, I probably will never use Lucky and Charm's real names. Safety comes first in blogland!!)
The next decision we faced was whether or not we would use the same stain in the back of the house on our deck. These two areas of our house can never be seen at the same time, so it wouldn't be crazy to use two different stain colors. It just would mean we'd have to make a Home Depot or Menards run and say a prayer that a new color would work better. It would cost us in time and money. We decided that we would forge ahead with the stain on hand to save that money for other projects and that time for our kids. After all, the result wasn't bad, just different than we expected.
I started on our small deck and figured I'd be wrapping late afternoon. I stained and stained and stained. Bill and I took turns watching the kids and staining. Bill's mom came over and watched Lucky during Charm's nap so we could both stain for a bit. We took a break for dinner. At 9:30pm we wrapped up for the night and the stairs still had to be stained. On Monday, I taped down the stairs and stained all 16 stairs in 3 hours. I was done at 2pm. Even though the color isn't 'perfect', I hope that we don't have to restain our deck for at least 4 years. I do not heart deck staining. Dropping a gallon of stain down the stairs to see if it would land in a nice artsy pattern so I could be done was an option I pondered for a good minute.
Here is the end result:


Do you notice anything weird about the stain color on the side rails versus the front stairs banister? There's a distinct color difference. The side rails are the dark color I mentioned earlier, while the banisters and stairs are the color I had preferred. Want to know why the color is different? It's different because we underestimated the importance of properly preparing the wood of our deck for staining.
Here is the preparation routine we followed: Friday night: Sweep and spray down with a hose. Saturday morning: Use free 'Deck Wash' deck cleaner from Menards to prepare the wood. There was a big caution on the deck wash to avoid metal (ie: the black metal rails) so Bill just avoided spraying any areas that surrounded the metal rails. The banister wood and stairs got a healthy dose of the 'Deck Wash', while the side rails did not. It wasn't bad stain, rather poor wood preparation given our deck composition.
Learn from our mistake: if you have metal rails on your deck, don't use a deck wash to prepare the wood. Use a power washer. We had considered using a power washer, but we don't own one and didn't want to do a rental. We honestly figured a hose spray down would suffice. Umm, no. This was the first time we stained a deck, so like all things in life, it was a learning experience. We've since been informed that our neighbors have a power washer they'd be happy to loan us in the future:). Perfect! We also know what color stain we prefer for the future:).


The line that runs perpendicular to the lay of the wood is actually from rain hitting the deck prior to our gutter installation. Maybe it will be less noticeable with time after future stainings?


Do you notice anything weird about the stain color on the side rails versus the front stairs banister? There's a distinct color difference. The side rails are the dark color I mentioned earlier, while the banisters and stairs are the color I had preferred. Want to know why the color is different? It's different because we underestimated the importance of properly preparing the wood of our deck for staining.
Here is the preparation routine we followed: Friday night: Sweep and spray down with a hose. Saturday morning: Use free 'Deck Wash' deck cleaner from Menards to prepare the wood. There was a big caution on the deck wash to avoid metal (ie: the black metal rails) so Bill just avoided spraying any areas that surrounded the metal rails. The banister wood and stairs got a healthy dose of the 'Deck Wash', while the side rails did not. It wasn't bad stain, rather poor wood preparation given our deck composition.
Learn from our mistake: if you have metal rails on your deck, don't use a deck wash to prepare the wood. Use a power washer. We had considered using a power washer, but we don't own one and didn't want to do a rental. We honestly figured a hose spray down would suffice. Umm, no. This was the first time we stained a deck, so like all things in life, it was a learning experience. We've since been informed that our neighbors have a power washer they'd be happy to loan us in the future:). Perfect! We also know what color stain we prefer for the future:).
While we enjoy our highly variegated deck, we will always remember how we underestimated the amount of time it would take to stain a deck with metal side rails that you have to work around. And we will also remember how we underestimated the importance of power washing a deck for uniform stain coverage. Lessons definitely learned.
Bill's new saying is 'Any project we tackle can be considered a success if the end result is better than what we started with AND if we learn something in the process.' Deck staining = Major Success!!
Deck Staining Cost (Money Cost, not Time Cost): $4 for 2 gallons of $1.97 stain and $4 for two 2 inch brushes and two foam brushes* = $8
(We actually only used one and a half gallons of stain and have one and a half gallons left for a future deck staining after we power wash, of course.)
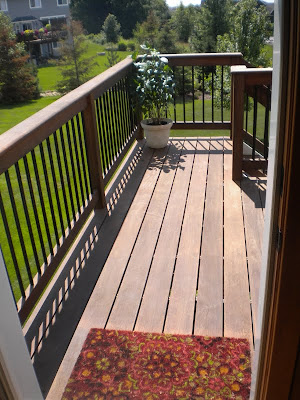
And here is our deck all ready for grilling:


*Another helpful tip: We used cheap 2 inch paint brushes to apply the stain so we wouldn't have to worry about cleaning them. They were less than $1 each at Walmart. We also used cheap foam brushes to get the areas in between the floor boards, which worked out really well.
No comments:
Post a Comment