Showing posts with label Chalkboard. Show all posts

Thursday, November 8, 2012

A Little Lucky Room Love


My sweet girl turned five last month, which is incredibly hard to believe.  We had a two week long birthday extravaganza for her with a dinner in Milwaukee on her birthday, a party with her school friends the following week, and another gathering up north the following weekend.  She loves being 5!!  Part of her present from Bill and I were a couple small room updates.  I don't think I've shared much in her room in the last year or so, though we've made a few changes in the space.  Her original room reveal post is here.


One area that was changed was her desk area.  When Charm got a desk area update, so did Lucky.  Her desk area went from this:


To this:

The back of the bookshelves above the desk were lined with dollar store foam core cut to size and covered with wrapping paper that I had on hand already.  I painted chalkboard paint on the back wall between her desk and upper cabinets and on the back wall under her desk.  Finally, I added a tension rod with little curtains to make a little play cave under the desk:).

When I wrote 'Lucky's Room' on her chalkboard, she insisted that I add 'Charm is allowed'.  So cute.  


I found this driftwood horse at Gordman's awhile back.  It was $28 with a coupon.  Lucky had a chance to ride a miniature horse at our local county fair this summer and she was really taken with the experience.  She likes horses:).

These wallflowers are by Umbra.  I picked them up on super clearance at Bed Bath and Beyond.
 
 
I paid just over $5 for the box (with a coupon) and spray painted some of them gold. 


Lucky keeps a bucket of chalk and a mini LED lantern in her girl cave.  


She also painted this canvas.  Each flower represents a family member, our fish included.


I spray painted this owl gold as well.

Lucky is spending more time drawing at her desk as of late, which is really fun to see.  She most certainly is growing up quickly!  I'll be back next week to share a few more updates in her room.

Have a fantastic weekend!

Wednesday, April 4, 2012

Oil Drip Pan Chalkboards!

As if this house didn't have enough chalkboards already:


I made a couple more using these oil drip pans that I picked up at Walmart for $10 each.  I wanted these particular chalkboards to also be magnetic, hence the use of the drip pan.


I spray primed the drip pans with gray primer, and then used the latex chalkboard paint that I had on hand from Charm's chalkboard desk project.  I taped a border around the edge of the drip pan so it would create a 'frame' of sorts.  I hung the boards/pans using 3M Command Strips (4 medium sized ones did the trick).  Here is the finished result:


Now, we have a nice learning center for the kids in the basement, right next to my crafting corner.  Lucky works on spelling words using magnetic letters and chalk, while Charm works on his food groups and identifying each letter.


When the chalkboard paint is on the drip pan, it's difficult to see the 'Auto Trend Products' imprint in the metal, although as seen below, chalk will bring it out again.  It's high enough up on the board, that I'm really not concerned about it getting in the way.  


Also, if you are interested in recreating this project try to find the straightest drip pan that you can.  I purchased our drip pans on two separate occasions.  I bought one to start because I honestly didn't know if it would fit on the left side of our exercise room door (A measurement before heading to Walmart would have been useful:)).  I had 4 pans to choose from, and I made sure I got a 'good one'.  I went back to Walmart a couple weeks later once I was ready to start painting, and there was only one drip pan left.  It was sort of bent and dirty.  I bought it anyway, because ever since January, I've been very anti-running to a million different stores to get the one thing I want.  I figure if one location doesn't have what I need, it's not meant to be.  In this case, I really wanted to get started on the project and there was one left, so I bought the wonky one.  I wish I would have waited.  It is flat enough, but when you write on it with chalk, it sort of bends in a little.  I may add a few more Command strips to solve the problem, but I do wish I would have just purchased a nice flat drip pan.  Lesson learned.  Sort of.  (I still saved myself a trip to another Walmart:)).


Cost Breakdown:
2 Oil Drip Pans $20
Spray primer already owned
Chalkboard paint already owned

Total Project Cost: $20 for 2 big ol' chalk/magnet boards

What do you think?  Has anyone else been putting chalkboard paint on EVERYTHING:)?

Linking up to The Rooster and The Hen.
Linking up to Finding Fabulous.

Thursday, March 22, 2012

Night Stand Update

Charm has a 'night stand' in his room that was all white.  His bed is also white.  His chair is....you guessed it, white.  I decided that he needed some variety and the easiest thing to paint was his night stand, which was originally from IKEA a few years ago and was natural pine colored at one point.  I failed to take a great 'before' picture.  Can you see it in this picture on the middle far right side??  


I painted the majority of the night stand with two coats of the black chalkboard paint that I seem to be using on EVERYTHING.  (Just wait, tomorrow I'll post about one final chalkboard project for Charm's Room.)  I have no intention of using chalk on the little table.  I just wanted it to be black.  Next, I was inspired by this dish towel that I picked up at Target on clearance for a dolla fiddie.  


I got out my trusty card board chevron stencil and recreated the pattern with a Sharpie marker on the top of the table/stand.  (I would have painted it, but the top is some kind of plastic-y surface that wouldn't allow latex paint to adhere to it.  I know this from experience.  I peeled the paint right off the top on my first attempt.  Ahh well.  Live and learn.  I didn't want to bother with primer, so I chose the Sharpie-stencil route.)


We use this table mainly as a place to rest Charm's night time water.  I also added a little container that had been in our pantry awhile back.  We've been writing out nightly prayers and adding them to our containers.  The kids are really enjoying this activity, and it's a good reminder for us to keep up with our nightly prayers.

I may have to save some of these prayer intentions for Lucky and Charm to read down the road:).

Wednesday, March 21, 2012

Charm's Desk Area

In Charm's Room, there is a built in desk that was looking like this:

In several years a decade, this will be really useful and wonderful, but for now, there wasn't much going on here, except some nice diaper storage in the cabinet above the desk.  I brainstormed about ways to make this area practical and fun.  

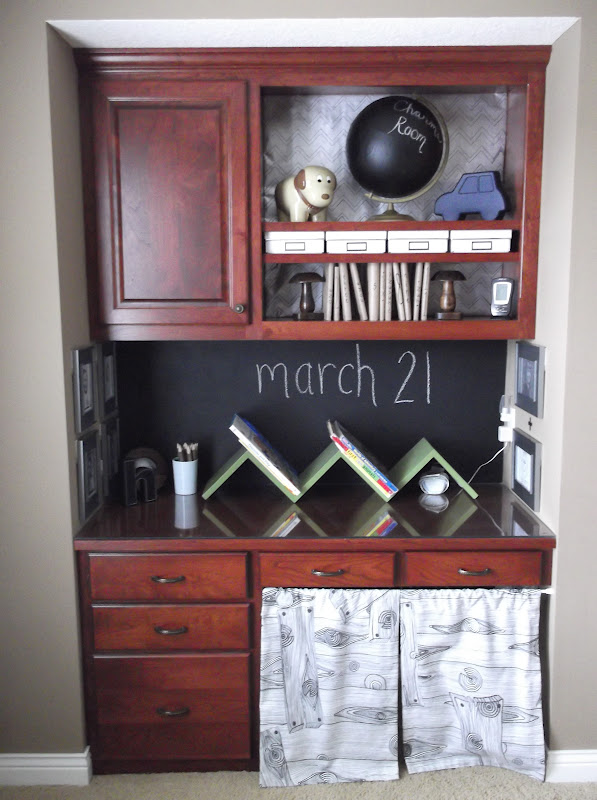
Here is how the space looks now:


I lined the bookshelves above the desk using clearance Christmas wrapping paper and foam core from the dollar store.  I used a cardboard chevron 'stencil' to make a light pattern on the silver paper.  The chalkboard globe on the top shelf is the same one from this post.  His dog bank was a gift, and the car night light up top was a clearance Target find.  The white boxes on the middle shelf are from IKEA and were 50 cents each on clearance.  The bottom shelf contains Charm's journals wrapped with brown craft paper.  The mushroom bookends were Target clearance finds for about $3 each. 


I painted the back wall with black chalkboard paint, including the area under the desk.  On top of the desk is a zig zag bookshelf that reminded me of the Lack Zig Zag shelf from IKEA that I've always loved (I think it's been discontinued because I couldn't find it online.)  Mine was $3.99 from Goodwill and it was red.  I spray painted it green last fall.  The pictures on the wall in this section are photocopies of all of Charm's grandparents as kids.  Bill and I are on the opposite wall...sort of...I still need to find a picture of Bill that will work, so there is a place holder for now.  The plus signs are just chalkboard vinyl that I cut out and stuck to the wall:)!


The area below the desk was turned into a fort!  I made mini-curtains and hung them with a tension rod.  


We made art work for the space using more of the small square canvases that we used in his gallery wall.  I painted the bike.  Charm painted the abstract piece.  I painted the 'h' over a piece of wrapping paper that I stapled on top of a canvas that has an extra Charm footprint underneath it.  I just couldn't paint over it.  This overall area serves as a space ship, a submarine and an airplane.  Charm or Lucky draw the 'buttons' for controlling the boat/rocket/etc using chalk on the back wall.  One of my absolute favorite things to do in the whole wide world is to sit in his room and watch Charm's imagination soar! 


I have just a couple more projects to complete in his room, and then I'll be able to call this room 'done', for a little while anyway.