Way back in August, I wrote
this post about potential projects using plans by
Ana White. One of the projects I mentioned was a factory cart. We completed our own factory cart recently using Ana's
plan as a starting point. We ended up tweaking our table to look more like the table in this image:
(Ana's plans create a shorter table with no overhang on the table's top. We made our table taller by using 1 x 10's for the sides instead of 1 x 6's, and we added an extra board across the top to allow for some overhang. Our top boards were also slightly longer than Ana's plan called for to allow overhang on the entire table.)
We used:
2 - 1 x 2 Boards 8' long
4 - 1 x 6 Boards 8' long
2 - 1 x 10 Boards 8' long
Here was our cut list at Home Depot:
4 - 1 x 2 @ 46"
2 - 1 x 6 @ 23.5"
9 - 1 x 6 @ 26.5"
2 - 1 x 10 @ 47.5"
2 - 1 x 10 @ 23.5"
Here are a couple progress shots:
We sanded and distressed the wood after it was put together. We used bags of screws, nails, hammers and paint lid openers to give it some character. As for the stain, I wanted it to look old and weathered, so I used a combination of Minwax's Ebony and Special Walnut. The Ebony was very dark, so I applied a small amount of it after wetting down the boards, and then I quickly wiped it off. The result was a grey stain, which I went back over with Special Walnut. I finished it off with a couple coats of Minwax Polyacrylic in Satin.

They were expensive at $13.99 per 6 inch fixed caster. It was the best price I could find online or elsewhere, especially considering I didn't have to pay any shipping. We debated between using a 5 inch vs. 6 inch caster, but in the end I much preferred the way the 6 inch caster looked. Originally, we had planned to purchase swivel casters to make the table easier to move, but they were $17.99 per caster, and when we thought about it, we figured we would probably be stubbing our toes on the casters when they weren't aligned with the table if we went the swivel route. We ended up spraying our casters with oil rubbed bronze spray paint only around the wheels (I may end up spraying the entire caster, but I wanted to try the two colored look for now.). I think they turned out fantastic! The casters really make the factory cart.
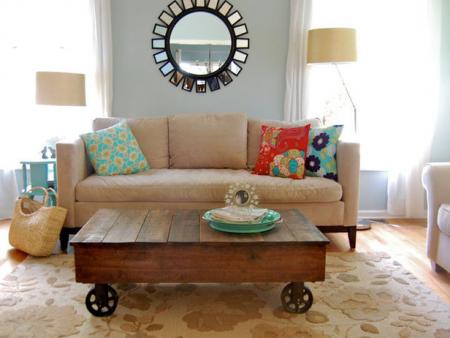
Here is how the factory cart looks as our new coffee table:
Initial Carving:)!
It's in our great room now, but it may move to the basement or the sun porch at times, as well! The big, flat surface has been great for crayon time, board game time and project time. It is the perfect height for our couch, and the kids love to push it around (in only two directions thanks to the fixed casters). And it was substantially cheaper than purchasing a vintage version or a Restoration Hardware cart.
Project Cost
Wood: $40
Stain: $10
Casters: $56
Total: $106
Has anyone tackled one of Ana's plans before?