I had read about Alex's Lemonade Stand in the past, and thought it would be a great activity for our family and would support a wonderful cause at the same time. Our goal was to hold our lemonade sale during National Lemonade Days, June 8-10 (Today through Sunday!!), with all of our earnings going to ALSF.
In order to reach our goal, we needed a stand of some sort. I turned to Pinterest for some lemonade stand ideas, although I knew from the get go, that I wanted an old looking stand like one I had seen at a barn sale about a year ago. (It wasn't for sale, but was so, so adorable.)
Here are a few stand ideas:
Sweet Shop Stand
Lemonade and Bake Stand
Ultimate Lemonade Stand
Adorable Lemonade Stand
But my absolute favorite lemonade stand is this one:
Rustic Lemonade Stand
I love the simple and rustic look of the stand. The stand pictured above is all over Pinterest from an engagement photo shoot that was taken using it as a prop. It is adult sized, so we needed to bring the scale down a bit, but we wanted the same overall feel. Bill crafted a plan and made a cut list for the kind folks at Home Depot.
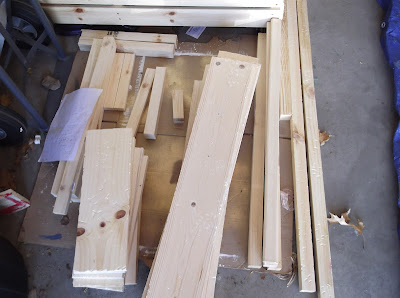
Our wood pile that once looked like this:
And later this:
Now looks like this:
Isn't it cute? I just love it:)! And I can't wait to get it stocked with lemonade and cookies and cups and straws for our big sale later today:)! I'll be taking pictures (of course:))!
In terms of cost, I'm not sure of the exact cost for this project since we bought the wood several weeks ago when we were also stocking up on dirt and mulch and plants for our landscaping project. It wasn't much though...maybe $30 in wood? The yellow paint that I used to write 'Lemonade' was 59 cents at Michael's (minus 20% with a coupon:)). The fabric banner was a clearance Target find from a few months ago for $1.18. I had the small chalkboard on hand already. We also had the stain on hand already from our factory cart project last fall.
Speaking of stain, in order to get the aged wood look I desired, I first wet the wood down with water. I applied a thin coat of ebony stain and wiped it off immediately. I worked in small sections so the resulting look was a light grey stain. Then I applied the dark walnut stain and wiped it off after a short time. Also, we learned from our factory cart, that it works best to stain the wood prior to construction. We stained our factory cart after it was already put together, and when the wood shrinks in the winter time, you can see unstained wood in the seams when you look closely.
All in all, I'm thinking the stand was probably $35. And, it will help to provide some storage in the garage when it's not being used as a lemonade stand. See this handy shelf Bill installed?
We'll be putting crates on and under the shelf for easy access toy and ball storage in the garage. Yeah for organization aids!
With that, I hope you all have a wonderful weekend and if you see a lemonade stand in your area, stop and buy a cup:)!!


WOW! it looks amazing! i have read about alex's stands as well- such a great story.
ReplyDeleteThanks Cassie! Yes...ALSF is a great cause. We happily sent in a $45 donation after our small sale:)!
DeleteSo cute! What a great idea. We will stop over later for a fresh glass. What time are you doing it?
ReplyDeleteThanks for stopping by Tami! And yes...pink lemonade cupcakes next time would be beyond awesome!!
DeleteOh Beth... this is so adorable! And I love the tips about aging the wood. I'm totally trying this for a rustic sign that I have on my "to do" list. It's simply beautiful! Good luck with the lemonade sale.
ReplyDelete~Danielle
Thanks Danielle! I forgot to mention in the post too that before I stained the wood, we took hammers and screws to the wood to create a worn look. Hammering the corners of fresh wood adds instant age to the wood:)! Good luck with your sign. I can't wait to see it.
DeleteDo you have steps and dimensions for this stand?
ReplyDelete